
项目(BIRP)在Github:
https://github.com/Remyuu/Unity-Interactive-Grass


先放一张10, 0500棵草在Compute Shader上未经任何优化在我的M1 pro上运行的截图,能跑个两百多帧。

加入八叉树视锥体剔除、距离渐隐等操作,帧数反而没有这么稳定了(想死),我猜测是CPU端每一帧的操作压力太大,需要维护这么大量的草地信息。但是只要剔除得足够多,跑个700帧+是没问题的(安慰)。另外,八叉树的深度也需要根据实际做优化,下图八叉树的深度我设置为了5。

前言
这篇文章已经越来越长了,主要留给自己回顾知识用,大佬们阅读的时候可能会感觉很多基础的内容。我是纯新手,恳求各位大佬的讨论和指正。

本文主要有两阶段:
- GS + TS的方法实现草地渲染最基础的效果
- 然后用CS重新实现草海渲染,加上了各种优化手段
几何着色器+曲面细分着色器的渲染方式应该是比较简单的,但是性能上限比较低,且平台兼容性差。
计算着色器配合GPU Instancing的方法应该才是当前业界的主流方法,并且在移动端上也能很好的运行。

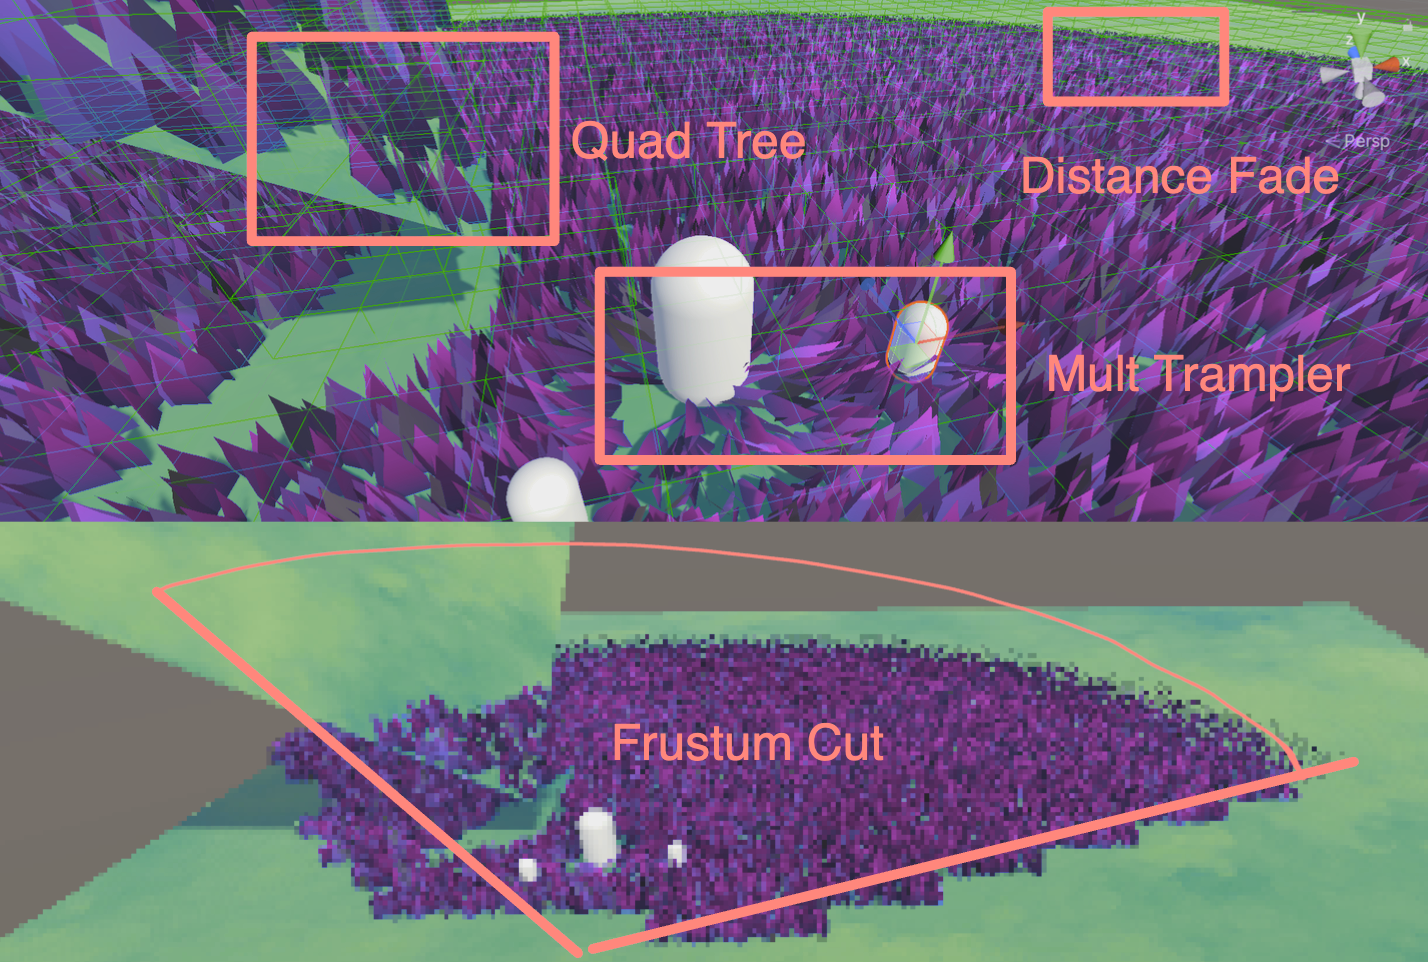
本文的CS渲染草海Demo主要参考了Colin和Minions Art的实现,更类似两者的杂交低级版(前者知乎上已经有大佬解析过了基于GPU Instance的草地渲染学习笔记)。用三组ComputeBuffer,一组是包含所有草的Buffer,一个是Append丢进Material的Buffer,另一组是一个可见Buffer(根据视锥剔除实时得到)。实现了用一颗四八叉树(奇偶深度)来做空间划分,加上通过视锥剔除得到当前视锥体内的所有草的索引,传给Compute Shader做进一步的处理(例如Mesh生成、四元数计算旋转、LoD等操作),然后再用一个变长的ComputeBuffer(ComputeBufferType.Append)将需要渲染的草,通过Instancing传给Material做最终的渲染。
还可以用Hi-Z的方案做剔除,挖一个坑,努力学习中。
另外参考了Minions Art大佬的文章复刻了一套编辑器刷草的工具(残缺版),通过维护一个顶点列表,存储所有的草地顶点位置。
再进一步的,通过另外维护一组Cut Buffer,如果被标记为 -1 值的草,则不做处理。如果标记为砍刀高度的非 -1 数值,则会传到Material中,通过WorldPos + Split.y再加上lerp的操作,将草的上半部分变得不可见,并且再修改草的颜色,最后加上一些草屑的例子效果,实现一个砍草的效果。

上一篇文章已经详细介绍了什么是曲面细分着色器,以及各种优化方法。接下来将曲面细分融入实际开发。另外,结合了几天速成的Compute Shader,捣鼓出了基于计算着色器的草地,详细可以这一篇笔记。以下是本文将要实现的小效果,并附完整代码:
- 草地渲染
- 草地渲染 – 几何着色器 (BIRP/URP)
- 定义草宽高朝向倾倒曲率渐变颜色带法向
- INTEGER曲面细分
- URP新增Visibility Map
- 草地渲染 – Compute Shader(BIRP/URP)work on MacOS
- 八叉树视锥体剔除
- 距离渐隐
- 草地交互
- 交互性几何着色器(BIRP/URP)
- 交互性Compute Shader(BIRP)work on MacOS
- Unity自定义草地生成工具
- 砍草系统
主要参考(抄袭)文章:
- 几何着色器绘制草地(BIRP):https://roystan.net/articles/grass-shader/
- 几何着色器绘制草地(URP)https://danielilett.com/2021-08-24-tut5-17-stylised-grass/
- Compute Shader教程-1:https://catlikecoding.com/unity/tutorials/basics/compute-shaders/
- Compute Shader教程-2:https://medium.com/ericzhan-publication/shader筆記-初探compute-shader-9efeebd579c1
- Compute Shader绘制草地:https://www.patreon.com/posts/53587750
- 草地绘制工具整合:https://www.youtube.com/watch?v=xKJHL8nQiuM
- 交互几何着色器草地(BIRP):https://www.patreon.com/posts/40090373
- 交互几何着色器草地(URP):https://www.patreon.com/posts/47447321
- 交互Compute Shader草地(BIRP/URP):https://www.patreon.com/posts/wip-patron-only-83683483
- Ned的参考:https://www.youtube.com/watch?v=DeATXF4Szqo
- URP草地Compute Shader参考代码:https://github.com/ColinLeung-NiloCat/UnityURP-MobileDrawMeshInstancedIndirectExample
- Compute Shader参考代码:https://github.com/ellioman/Indirect-Rendering-With-Compute-Shaders
草地渲染有很多种方案,本文中的两种:
- 几何着色器+曲面细分着色器
- 计算着色器+GPU Instancing
首先,第一种方案局限性很大。很多移动设备还有Metal不支持GS,而且GS每一帧都会重新计算一次Mesh,开销还是挺大的。
其次,MacOS就不能跑几何着色器了吗?也不是。想要用GS,就必须使用OpenGL,而不是Metal。但是需要注意,Apple对OpenGL最高支持到OpenGL 4.1。也就是说,这个版本不支持Compute Shader。当然,Intel时期的MacOS可以支持到OpenGL 4.3,可以同时跑CS和GS。M系列芯片就没这个命运了,要么用4.1,要么老老实实用Metal。在我的M1p mbp上,即使选择虚拟机(Parallels 18+ 提供了DX11和Vulkan),但是运行在macOS上的Vulkan是经过转译的,本质还是Metal,所以还是没GS。因此macOS M1之后就没有原生的GS了。
再者,Metal 甚至不直接支持 Tessellation 着色器。Apple压根不想在芯片上对这两个东西做支持。为什么呢?因为效率太低了。在M芯片上,TS甚至都是用CS模拟的!
总结一下,几何着色器是一个没有出路的技术,尤其是在Mesh Shader问世之后。虽然GS在Unity中很流行,但任何类似的效果都可以在CS上Instance出来,并且效率更高。现在的新显卡虽然还是会支持GS,因为目前市面上还是有相当多的游戏在用GS。只是Apple不考虑兼容性,直接砍掉了。

这篇文章详细讲述了为啥GS这么慢:http://www.joshbarczak.com/blog/?p=667。简单的说就是,Intel通过阻塞线程等方式优化了GS,其他芯片则没有这种优化。
本文作为学习笔记,很有可能会出错。
一、几何着色器渲染草概述(BIRP)
1.1 概述
Domain Stage之后,可以选择使用几何着色器。

几何着色器将整个基元作为输入,并能够在输出上生成顶点。几何着色器的输入是完整基元的顶点(三角形为三个顶点,线为两个顶点或点为单个顶点)。每个基元都将调用一次几何着色器。
从网页下载初始工程。
1.2 绘制三角形
绘制一个三角形。
// Add inside the CGINCLUDE block.
struct geometryOutput
{
    float4 pos : SV_POSITION;
};

...
    //顶点着色器
return vertex;
...

[maxvertexcount(3)]
void geo(triangle float4 IN[3] : SV_POSITION, inout TriangleStream<geometryOutput> triStream)
{
    geometryOutput o;

    o.pos = UnityObjectToClipPos(float4(0.5, 0, 0, 1));
    triStream.Append(o);

    o.pos = UnityObjectToClipPos(float4(-0.5, 0, 0, 1));
    triStream.Append(o);

    o.pos = UnityObjectToClipPos(float4(0, 1, 0, 1));
    triStream.Append(o);
}

…

// Add inside the SubShader Pass, just below the #pragma fragment frag line.
#pragma geometry geo
實際上,我們為網格中的每個頂點繪製了一個三角形,但我們分配給三角形頂點的位置是恆定的 – 它們不會針對每個輸入頂點而改變 – 將所有三角形放置在彼此之上了。
1.3 顶点偏移
因此,根据每一个顶点位置做偏移即可。
// Add to the top of the geometry shader.
float3 pos = IN[0];

…

// Update each assignment of o.pos.
o.pos = UnityObjectToClipPos(pos + float3(0.5, 0, 0));

…

o.pos = UnityObjectToClipPos(pos + float3(-0.5, 0, 0));

…

o.pos = UnityObjectToClipPos(pos + float3(0, 1, 0));
1.4 旋转叶片
但是需要注意,目前三角形都是一个方向发射,因此加入法线修正。构建TBN矩阵,与当前给的方向做乘积。并且整理代码。
float3 vNormal = IN[0].normal;
float4 vTangent = IN[0].tangent;
float3 vBinormal = cross(vNormal, vTangent) * vTangent.w;

float3x3 tangentToLocal = float3x3(
    vTangent.x, vBinormal.x, vNormal.x,
    vTangent.y, vBinormal.y, vNormal.y,
    vTangent.z, vBinormal.z, vNormal.z
    );

triStream.Append(VertexOutput(pos + mul(tangentToLocal, float3(0.5, 0, 0))));
triStream.Append(VertexOutput(pos + mul(tangentToLocal, float3(-0.5, 0, 0))));
triStream.Append(VertexOutput(pos + mul(tangentToLocal, float3(0, 0, 1))));
1.5 上色
然后定义草的上下两个颜色,用uv做lerp渐变。
return lerp(_BottomColor, _TopColor, i.uv.y);
1.6 旋转矩阵原理
做随机朝向。这里构建了一个旋转矩阵。原理在GAMES101也有讲到哦。B站还有一个公式推导的视频,讲得也很清晰!简单的推导思路就是,假設是向量 $a$ 繞著n軸旋轉至 $b$ ,則將 $a$ 分解為平行於n軸的分量(發現是不變的)加上垂直於n軸的分量。

float3x3 AngleAxis3x3(float angle, float3 axis)
{
    float c, s;
    sincos(angle, s, c);

    float t = 1 - c;
    float x = axis.x;
    float y = axis.y;
    float z = axis.z;

    return float3x3(
        t * x * x + c, t * x * y - s * z, t * x * z + s * y,
        t * x * y + s * z, t * y * y + c, t * y * z - s * x,
        t * x * z - s * y, t * y * z + s * x, t * z * z + c
        );
}
旋转矩阵 $R$ 这里用罗德里格旋转公式(Rodrigues’ rotation formula)来计算: $$R=I+sin(θ)⋅[k]×+(1−cos(θ))⋅[k]×2$$
其中, $\theta$ 是旋转角。$k$ 是单位旋转轴。 $I$ 是单位矩阵。 $[k]_{\times}$ 是轴 $k$ 对应的反对称矩阵。
对于一个单位向量 $k=(x,y,z)$ , 反对称矩阵 $[k]_{\times}=\left[\begin{array}{ccc} 0 & -z & y \\ z & 0 & -x \\ -y & x & 0 \end{array}\right]$ 最后得到的矩阵元素:
$$ \begin{array}{ccc} tx^2 + c & txy – sz & txz + sy \\ txy + sz & ty^2 + c & tyz – sx \\ txz – sy & tyz + sx & tz^2 + c \\ \end{array} $$
float3x3 facingRotationMatrix = AngleAxis3x3(rand(pos) * UNITY_TWO_PI, float3(0, 0, 1));
1.7 叶片倾倒
得到随机方向朝向的草,接下来在x或者y轴任意随机方向倾倒。
float3x3 bendRotationMatrix = AngleAxis3x3(rand(pos.zzx) * _BendRotationRandom * UNITY_PI * 0.5, float3(-1, 0, 0));
1.8 叶片大小
调整草的宽与高。原本我们默认高和宽都是一个单位。为了让草更加自然,这个步骤再加入rand,显得更加自然。
_BladeWidth("Blade Width", Float) = 0.05
_BladeWidthRandom("Blade Width Random", Float) = 0.02
_BladeHeight("Blade Height", Float) = 0.5
_BladeHeightRandom("Blade Height Random", Float) = 0.3


float height = (rand(pos.zyx) * 2 - 1) * _BladeHeightRandom + _BladeHeight;
float width = (rand(pos.xzy) * 2 - 1) * _BladeWidthRandom + _BladeWidth;


triStream.Append(VertexOutput(pos + mul(transformationMatrix, float3(width, 0, 0)), float2(0, 0)));
triStream.Append(VertexOutput(pos + mul(transformationMatrix, float3(-width, 0, 0)), float2(1, 0)));
triStream.Append(VertexOutput(pos + mul(transformationMatrix, float3(0, 0, height)), float2(0.5, 1)));
1.9 曲面细分
由于数量太少,此处上曲面细分。

1.10 扰动
让草动起来,加法线随着 _Time 扰动。采样贴图,然后计算风的旋转矩阵,应用到草上。
float2 uv = pos.xz * _WindDistortionMap_ST.xy + _WindDistortionMap_ST.zw + _WindFrequency * _Time.y;

float2 windSample = (tex2Dlod(_WindDistortionMap, float4(uv, 0, 0)).xy * 2 - 1) * _WindStrength;

float3 wind = normalize(float3(windSample.x, windSample.y, 0));

float3x3 windRotation = AngleAxis3x3(UNITY_PI * windSample, wind);

float3x3 transformationMatrix = mul(mul(mul(tangentToLocal, windRotation), facingRotationMatrix), bendRotationMatrix);
1.11 修正叶片旋转问题
此时风可能会沿着x和y轴的旋转,具体表现就是:

将脚下的两个点单独写一个只沿着z旋转的矩阵。
float3x3 transformationMatrixFacing = mul(tangentToLocal, facingRotationMatrix);

…

triStream.Append(VertexOutput(pos + mul(transformationMatrixFacing, float3(width, 0, 0)), float2(0, 0)));
triStream.Append(VertexOutput(pos + mul(transformationMatrixFacing, float3(-width, 0, 0)), float2(1, 0)));
1.12 叶片曲率
为了让叶子具有曲率,就只能增加顶点。另外,由于当前开启了双面渲染,顶点的顺序就没什么所谓了。这里手动插值for loop构建三角形。计算一个 forward 用于弯曲叶片。
float forward = rand(pos.yyz) * _BladeForward;


for (int i = 0; i < BLADE_SEGMENTS; i++)
{
    float t = i / (float)BLADE_SEGMENTS;
    // Add below the line declaring float t.
    float segmentHeight = height * t;
    float segmentWidth = width * (1 - t);
    float segmentForward = pow(t, _BladeCurve) * forward;
    float3x3 transformMatrix = i == 0 ? transformationMatrixFacing : transformationMatrix;
    triStream.Append(GenerateGrassVertex(pos, segmentWidth, segmentHeight, segmentForward, float2(0, t), transformMatrix));
    triStream.Append(GenerateGrassVertex(pos, -segmentWidth, segmentHeight, segmentForward, float2(1, t), transformMatrix));
}

triStream.Append(GenerateGrassVertex(pos, 0, height, forward, float2(0.5, 1), transformationMatrix));

1.13 制造阴影
在另外一个Pass中制造阴影,输出。
Pass{
    Tags{
        "LightMode" = "ShadowCaster"
    }

    CGPROGRAM
    #pragma vertex vert
    #pragma geometry geo
    #pragma fragment frag
    #pragma hull hull
    #pragma domain domain
    #pragma target 4.6
    #pragma multi_compile_shadowcaster

    float4 frag(geometryOutput i) : SV_Target{
        SHADOW_CASTER_FRAGMENT(i)
    }

    ENDCG
}
1.14 接收阴影
直接在Frag用 SHADOW_ATTENUATION 判断阴影。
// geometryOutput struct.
unityShadowCoord4 _ShadowCoord : TEXCOORD1;
...
o._ShadowCoord = ComputeScreenPos(o.pos);
...
#pragma multi_compile_fwdbase
...
return SHADOW_ATTENUATION(i);

1.15 去除阴影痤疮
去除表面痤疮。
#if UNITY_PASS_SHADOWCASTER
    o.pos = UnityApplyLinearShadowBias(o.pos);
#endif
1.16 增加法线
给几何着色器生成的顶点加法线信息。
struct geometryOutput
{
    float4 pos : SV_POSITION;
    float2 uv : TEXCOORD0;
    unityShadowCoord4 _ShadowCoord : TEXCOORD1;
    float3 normal : NORMAL;
};
...
o.normal = UnityObjectToWorldNormal(normal);

1.17 完整代码‼️(BIRP)
最终效果。

代码:
完整的:https://pastebin.com/U14m1Nu0
二、几何着色器渲染草(URP)
2.1 参考
刚才已经写了BIRP版本,现在只需要移植一下就好了。
- URP代码规范参考:https://www.cyanilux.com/tutorials/urp-shader-code/
- BIRP->URP速查表:https://cuihongzhi1991.github.io/blog/2020/05/27/builtinttourp/
大家可以跟着Daniel的这篇文章从头写一遍,也可以跟着我修改刚刚的代码。需要注意的是,原repo的空间变换代码是存在问题的,可以在Pull request中找到解决方案。
现将上面BIRP的曲面细分着色器整理到一起。
- Tags改为URP
- 头文件引入替换为URP版本
- 变量用CBuffer包围
- 阴影投射、接收代码
2.2 开始改
声明URP管线。
LOD 100
Cull Off
Pass{
    Tags{
        "RenderType" = "Opaque"
        "Queue" = "Geometry"
        "RenderPipeline" = "UniversalPipeline"
    }
导入URP的库。
#include "Packages/com.unity.render-pipelines.universal/ShaderLibrary/Core.hlsl"
#include "Packages/com.unity.render-pipelines.universal/ShaderLibrary/Lighting.hlsl"
#include "Packages/com.unity.render-pipelines.universal/ShaderLibrary/ShaderVariablesFunctions.hlsl"

o._ShadowCoord = ComputeScreenPos(o.pos);
改一下函数。
// o.normal = UnityObjectToWorldNormal(normal);
o.normal = TransformObjectToWorldNormal(normal);
URP接收阴影。这里最好在顶点着色器计算,但是为了方便就全放在几何着色器计算了。

然后生成阴影。ShadowCaster Pass。
Pass{
    Name "ShadowCaster"
    Tags{ "LightMode" = "ShadowCaster" }

    ZWrite On
    ZTest LEqual

    HLSLPROGRAM

        half4 frag(geometryOutput input) : SV_TARGET{
            return 1;
        }

    ENDHLSL
}
2.3 完整代码‼️(URP)
三、优化曲面细分逻辑(BIRP/URP)
3.1 整理代码
上面我们都只是采用固定数量的细分等级,我不能接受。如果不了解曲面细分原理的可以看我的曲面细分文章,里面详细讲了几种优化细分的方案。
我用第一节完成的BIRP版本的代码为例子。当前版本只有Uniform的细分。

_TessellationUniform("Tessellation Uniform", Range(1, 64)) = 1
当前各个阶段输出的结构体相当混乱,重新整理一下。

3.1 划分模式

[KeywordEnum(INTEGER, FRAC_EVEN, FRAC_ODD, POW2)] _PARTITIONING("Partition algoritm", Float) = 0

#pragma shader_feature_local _PARTITIONING_INTEGER _PARTITIONING_FRAC_EVEN _PARTITIONING_FRAC_ODD _PARTITIONING_POW2

#if defined(_PARTITIONING_INTEGER)
    [partitioning("integer")]
#elif defined(_PARTITIONING_FRAC_EVEN)
    [partitioning("fractional_even")]
#elif defined(_PARTITIONING_FRAC_ODD)
    [partitioning("fractional_odd")]
#elif defined(_PARTITIONING_POW2)
    [partitioning("pow2")]
#else
    [partitioning("integer")]
#endif
3.2 细分的视锥体剔除
在BIRP中,使用 _ProjectionParams.z 表示远平面,URP中使用UNITY_RAW_FAR_CLIP_VALUE 。
bool IsOutOfBounds(float3 p, float3 lower, float3 higher) { //给定矩形判断
    return p.x < lower.x || p.x > higher.x || p.y < lower.y || p.y > higher.y || p.z < lower.z || p.z > higher.z;
}
bool IsPointOutOfFrustum(float4 positionCS) { //视锥体判断
    float3 culling = positionCS.xyz;
    float w = positionCS.w;
    float3 lowerBounds = float3(-w, -w, -w * _ProjectionParams.z);
    float3 higherBounds = float3(w, w, w);
    return IsOutOfBounds(culling, lowerBounds, higherBounds);
}
bool ShouldClipPatch(float4 p0PositionCS, float4 p1PositionCS, float4 p2PositionCS) {
    bool allOutside = IsPointOutOfFrustum(p0PositionCS) &&
        IsPointOutOfFrustum(p1PositionCS) &&
        IsPointOutOfFrustum(p2PositionCS);
    return allOutside;
}

TessellationControlPoint vert(Attributes v)
{
    ...
    o.positionCS = UnityObjectToClipPos(v.vertex);
    ...
}

TessellationFactors patchConstantFunction (InputPatch<TessellationControlPoint, 3> patch)
{
    TessellationFactors f;
    if(ShouldClipPatch(patch[0].positionCS, patch[1].positionCS, patch[2].positionCS)){
        f.edge[0] = f.edge[1] = f.edge[2] = f.inside = 0;
    }else{
        f.edge[0] = _TessellationFactor;
        f.edge[1] = _TessellationFactor;
        f.edge[2] = _TessellationFactor;
        f.inside = _TessellationFactor;
    }
    return f;
}
但是需要注意的是,這裡傳入的判斷是草皮的CS座標。如果三角形草皮完全離開屏幕,但是草長得高還可能會在屏幕中,就會導致草突然消失的畫面BUG。這就看項目的需求了,如果是仰視角並且草地比較矮的項目,就可以使用這個操作。
仰視角問題不大。

如果是伏地魔視角,草地並不完整,過度剔除了。

3.3 屏幕距離的細分控制
實現近處的草密集,遠處的草稀疏,但是基於屏幕距離(CS空間)。這個方法會受到分辨率的影響。
float EdgeTessellationFactor(float scale, float4 p0PositionCS, float4 p1PositionCS) {
    float factor = distance(p0PositionCS.xyz / p0PositionCS.w, p1PositionCS.xyz / p1PositionCS.w) / scale;
    return max(1, factor);
}

TessellationFactors patchConstantFunction (InputPatch<TessellationControlPoint, 3> patch)
{
    TessellationFactors f;

    f.edge[0] = EdgeTessellationFactor(_TessellationFactor,
        patch[1].positionCS, patch[2].positionCS);
    f.edge[1] = EdgeTessellationFactor(_TessellationFactor,
        patch[2].positionCS, patch[0].positionCS);
    f.edge[2] = EdgeTessellationFactor(_TessellationFactor,
        patch[0].positionCS, patch[1].positionCS);
    f.inside = (f.edge[0] + f.edge[1] + f.edge[2]) / 3.0;


    #if defined(_CUTTESS_TRUE)
        if(ShouldClipPatch(patch[0].positionCS, patch[1].positionCS, patch[2].positionCS))
            f.edge[0] = f.edge[1] = f.edge[2] = f.inside = 0;
    #endif

    return f;
}
Tessellation Factor = 0.08


並且劃分模式不建議選取Frac,不然就會有強烈的抖動,非常晃眼睛。這種方法我不太喜歡。
3.4 相機距離細分
计算 「两点间的距离」与「两顶点的中点与相机位置的距离」的比值。比值越大说明占据屏幕的空间就越大,需要更多的细分程度。
float EdgeTessellationFactor_WorldBase(float scale, float3 p0PositionWS, float3 p1PositionWS) {
    float length = distance(p0PositionWS, p1PositionWS);
    float distanceToCamera = distance(_WorldSpaceCameraPos, (p0PositionWS + p1PositionWS) * 0.5);
    float factor = length / (scale * distanceToCamera * distanceToCamera);
    return max(1, factor);
}
...
f.edge[0] = EdgeTessellationFactor_WorldBase(_TessellationFactor_WORLD_BASE,
    patch[1].vertex, patch[2].vertex);
f.edge[1] = EdgeTessellationFactor_WorldBase(_TessellationFactor_WORLD_BASE,
    patch[2].vertex, patch[0].vertex);
f.edge[2] = EdgeTessellationFactor_WorldBase(_TessellationFactor_WORLD_BASE,
    patch[0].vertex, patch[1].vertex);
f.inside = (f.edge[0] + f.edge[1] + f.edge[2]) / 3.0;

还有改进空间。调整草地的密集度,使得近距离的草地不太密集,而中距离的草地曲线更为平滑,引入非线性因子来控制距离与镶嵌因子的关系。
float EdgeTessellationFactor_WorldBase(float scale, float3 p0PositionWS, float3 p1PositionWS) {
    float length = distance(p0PositionWS, p1PositionWS);
    float distanceToCamera = distance(_WorldSpaceCameraPos, (p0PositionWS + p1PositionWS) * 0.5);
    // 使用平方根函数调整距离的影响,使中距离的镶嵌因子变化更平滑
    float adjustedDistance = sqrt(distanceToCamera);
    // 调整 scale 的影响,可能需要根据实际效果进一步微调这里的系数
    float factor = length / (scale * adjustedDistance);
    return max(1, factor);
}
这样就比较合适了。

3.5 Visibility Map 控制草地细分


顶点着色器读取贴图,传给曲面细分着色器,在PCF计算细分逻辑。
以FIXED模式为例:
_VisibilityMap("Visibility Map", 2D) = "white" {}
TEXTURE2D (_VisibilityMap);SAMPLER(sampler_VisibilityMap);
struct Attributes
{
    ...
    float2 uv : TEXCOORD0;
};
struct TessellationControlPoint
{
    ...
    float visibility : TEXCOORD1;
};
TessellationControlPoint vert(Attributes v){
    ...
    float visibility = SAMPLE_TEXTURE2D_LOD(_VisibilityMap, sampler_VisibilityMap, v.uv, 0).r;
    o.visibility    = visibility;
    ...
}
TessellationFactors patchConstantFunction (InputPatch<TessellationControlPoint, 3> patch){
    ...
    float averageVisibility = (patch[0].visibility + patch[1].visibility + patch[2].visibility) / 3; // 计算三个顶点灰度值的平均值
    float baseTessellationFactor = _TessellationFactor_FIXED;
    float tessellationMultiplier = lerp(0.1, 1.0, averageVisibility); // 根据平均灰度值调整因子
    #if defined(_DYNAMIC_FIXED)
        f.edge[0] = _TessellationFactor_FIXED * tessellationMultiplier;
        f.edge[1] = _TessellationFactor_FIXED * tessellationMultiplier;
        f.edge[2] = _TessellationFactor_FIXED * tessellationMultiplier;
        f.inside  = _TessellationFactor_FIXED * tessellationMultiplier;
    ...
3.6 完整代码‼️(BIRP)
Grass Shader:
3.7 完整代码‼️(URP)

URP有一些地方不太一样,比如说计算ShadowBias,就需要下面这样,不展开了,自己看代码吧。
#if UNITY_PASS_SHADOWCASTER
    // o.pos = UnityApplyLinearShadowBias(o.pos);
    o.shadowCoord = TransformWorldToShadowCoord(ApplyShadowBias(posWS, norWS, 0));
#endif
Grass Shader:
四、互动草地
URP和BIRP完全一致。
4.1 实现步骤
原理很简单,脚本传角色的世界坐标进来,然后根据设定好的半径、互动强度,将草压弯。
uniform float3 _PositionMoving; // 物体的位置
float _Radius; // 物体的交互半径
float _Strength; // 交互强度
在草地生成的循环中,计算每个草片段与物体之间的距离,并根据这个距离调整草地的位置。
float dis = distance(_PositionMoving, posWS); // 计算距离
float radiusEffect = 1 - saturate(dis / _Radius); // 根据距离计算效果衰减
float3 sphereDisp = pos - _PositionMoving; // 计算位置差
sphereDisp *= radiusEffect * _Strength; // 应用衰减和强度
sphereDisp = clamp(sphereDisp, -0.8, 0.8); // 限制最大位移
然后在各个草叶中计算新的位置。
// 应用交互效果
float3 newPos = i == 0 ? pos : pos + (sphereDisp * t);
triStream.Append(GenerateGrassVertex(newPos, segmentWidth, segmentHeight, segmentForward, float2(0, t), transformMatrix));
triStream.Append(GenerateGrassVertex(newPos, -segmentWidth, segmentHeight, segmentForward, float2(1, t), transformMatrix));
别忘了for loop外面,也就是最上面的顶点。
// 最后的草片段
float3 newPosTop = pos + sphereDisp;
triStream.Append(GenerateGrassVertex(newPosTop, 0, height, forward, float2(0.5, 1), transformationMatrix));
triStream.RestartStrip();
在URP中,使用 uniform float3 _PositionMoving 可能会导致SRP Batcher失败。


4.2 脚本代码
哪个物体需要添加交互,就绑定上去。
using UnityEngine;

public class ShaderInteractor : MonoBehaviour
{
    // Update is called once per frame
    void Update()
    {
        Shader.SetGlobalVector("_PositionMoving", transform.position);
    }
}
4.3 完整代码‼️(URP)
Grass shader:
五、计算着色器渲染草 v1.0
为什么是 v1.0 呢,因为我觉得这个计算着色器渲染草海的难度比较大,很多目前不会的以后可以慢慢完善进来。我也写了一些Compute Shader的笔记。
- Compute Shader学习笔记(一)
- Compute Shader学习笔记(二)之 后处理效果
- Compute Shader学习笔记(二)之 粒子效果与群集行为模拟
- Compute Shader学习笔记(三)之 草地渲染
5.1 回顾/整理
上面的Compute Shader笔记里面完整的写了如何从零用CS写一个程式化的草海。如果忘记了在这里重新回顾一下。

在初始化阶段CPU要做的事情还是很多的,首先定义草的Mesh、Buffer传递(草的宽度、高度随机、每个草生成的位置、草地的随机朝向、草的随机色深)、还要专门向Compute Shader传递最大的弯曲值、草地互动半径。
每一帧CPU还要向Compute Shader传递时间变量、风向、风力/速、风场缩放因子。
Compute Shader利用CPU传递的信息计算出草应该怎么转向,使用了四元数作为输出。
最后Shader通过实例化标示ID和所有计算结果,首先计算顶点偏移,然后应用四元数旋转,最后修改法线信息。
这个Demo其实可以进一步优化,比如将更多的计算放在Compute Shader中进行,比如生成Mesh的过程、草地的宽高、随机朝向倾倒等。还可以优化一下更多实时的参数调节变量。还可以将做各种优化剔除,比如传入相机位置通过距离来剔除、或者用视锥体剔除等等,这个剔除的过程就需要使用到一些原子操作。还可以多物体交互。还可以优化交互草地变形的逻辑,比如交互的程度与交互物体的距离呈次方的关系等。还可以增加引擎功能,开发出笔刷刷草的功能,这就有可能需要一套四叉树存储系统等等。
并且在Compute Shader中,能用向量一把梭哈就不要用标量。
首先先整理一下代码。将不需要每帧都发给Compute Shader的变量都放在一个函数统一初始化。将Inspector面板整理一下。(代码改动很多)

首先将基本上所有的计算都放在GPU上运行了,除了每个草的世界坐标在CPU中计算,通过一个Buffer传给GPU。

Buffer传输的大小则完全取决于地面Mesh的大小与设置的密度。也就是说,如果是超级大的开放世界,这个Buffer就会变得超级大。一个 5*5 大小的草地,将Density设置为0.5,就大约会发送 312576 个草数据,实际数据就会达到 4*312576*4=5001216 字节,按照CPU->GPU的传输速度为8 GB/s 来计算,大约需要传10毫秒左右。

万幸这个Buffer并不是每一帧都需要传输,但是也足够引起我们的重视。假如当前草地大小变大到 100*100,所需时间将翻数倍,很吓人。而且这其中很多顶点我们都可能用不到,这就造成了很大的性能浪费。
我在Compute Shader里面加入了生成perlin噪声的函数,还有xorshift128随机数生成算法。
// Perlin 随机数算法
float hash(float x, float y) {
    return frac(abs(sin(sin(123.321 + x) * (y + 321.123)) * 456.654));
}
float perlin(float x, float y){
    float col = 0.0;
    for (int i = 0; i < 8; i++) {
        float fx = floor(x); float fy = floor(y);
        float cx = ceil(x); float cy = ceil(y);
        float a = hash(fx, fy); float b = hash(fx, cy);
        float c = hash(cx, fy); float d = hash(cx, cy);
        col += lerp(lerp(a, b, frac(y)), lerp(c, d, frac(y)), frac(x));
        col /= 2.0; x /= 2.0; y /= 2.0;
    }
    return col;
}
// XorShift128 随机数算法 -- Edited 直接输出归一化数据
uint state[4];
void xorshift_init(uint s) {
    state[0] = s; state[1] = s | 0xffff0000u;
    state[2] = s << 16; state[3] = s >> 16;
}
float xorshift128() {
    uint t = state[3]; uint s = state[0];
    state[3] = state[2]; state[2] = state[1]; state[1] = s;
    t ^= t << 11u; t ^= t >> 8u;
    state[0] = t ^ s ^ (s >> 19u);
    return (float)state[0] / float(0xffffffffu);
}

[numthreads(THREADGROUPSIZE,1,1)]
void BendGrass (uint3 id : SV_DispatchThreadID)
{
    xorshift_init(id.x * 73856093u ^ id.y * 19349663u ^ id.z * 83492791u);
    ...
}
复盘一下,目前,在CPU用的是草地的一个AABB平均铺草的逻辑生成所有可能的草的顶点,然后传给GPU,在Compute Shader中做一些剔除、LoD等操作。

目前为止我搞了三个Buffer。

m_InputBuffer就是将所有的草一股脑传给GPU,没有任何剔除的。上图左边的结构体。
m_OutputBuffer是一个变长的Buffer,在Compute Shader中慢慢增加的。如果当前线程ID的草适合,就会被加到这个Buffer中,用于一会的Instanced渲染。上图右边的结构体。
m_argsBuffer是一个参数化的Buffer,类型和其他Buffer都不同的。最后用于Draw传参,具体内容就是指定了批量渲染的顶点数量、渲染实例数量等等。详细来看看:

第一个参数,我的草Mesh有七个三角形,所以要渲染21个顶点。
第二个参数暂时设置为0,表示啥也不需要渲染。这个数字会在Compute Shader计算结束后,根据m_OutputBuffer的长度来动态设置。也就是说,Compute Shader里Append了多少个草,这里就会变成多少。
第三第四个参数分别表示:第一个渲染的顶点的索引、第一个实例化的索引。
后面第五个参数我没用过,不知道有啥用。
最后一步长这样,把Mesh、材质、AABB还有参数Buffer传进去了。

5.2 自定义Unity工具
新建一个C#脚本,存在项目的Editor目录下(没有就创建一个)。脚本继承自Editor,然后写上 [CustomEditor(typeof(XXX))] 。表示你是为XXX工作。我为GrassControl工作,然后可以将现在这个写的东西附加到XXX上。当然也可以单独一个窗口,应该就是继承自EditorWindow。

在 OnInspectorGUI() 函数中写工具。比方说写一个Label。
GUILayout.Label("== Remo Grass Generator ==");
想要在Inspector居中,加一段参数。
GUILayout.Label("== Remo Grass Generator ==", new GUIStyle(EditorStyles.boldLabel) { alignment = TextAnchor.MiddleCenter });
位置太挤了?加一行空格就好。
EditorGUILayout.Space();
想在XXX的上方附加工具,那所有逻辑就写在OnInspectorGUI的上方。
... // 写在这
// 默认的 GrassControl 的 Inspector 界面
base.OnInspectorGUI();
创建按钮,并且按下的代码:
if (GUILayout.Button("xxx"))
{
    ...//按下后的代码
反正目前我用到的就这些。
5.3 Editor选中对象生成草
获取当前服务的脚本的Object,并且显示在Inspector上,也很简单。
[SerializeField] private GameObject grassObject;
...
grassObject = (GameObject)EditorGUILayout.ObjectField("名字随便写", grassObject, typeof(GameObject), true);
if (grassObject == null)
{
    grassObject = FindObjectOfType<GrassControl>()?.gameObject;
}
获取完了之后,就可以通过GameObject访问当前脚本里边的东西了。
如何获取在Editor窗口选中的对象呢?一行代码就搞掂。
foreach (GameObject obj in Selection.gameObjects)将选中的物体展示在Inspector面板上。注意,这里需要处理多选物体的情况,否则会Warning。
// 实时显示当前Editor选中对象并控制按钮的可用性
EditorGUILayout.LabelField("Selection Info:", EditorStyles.boldLabel);
bool hasSelection = Selection.activeGameObject != null;
GUI.enabled = hasSelection;
if (hasSelection)
    foreach (GameObject obj in Selection.gameObjects)
        EditorGUILayout.LabelField(obj.name);
else
    EditorGUILayout.LabelField("No active object selected.");
接下来获取选中对象的MeshFilter和Renderer,由于要Raycast检测,就再获取个Collider。若没有就创建一个。

然后写生草的代码,这里就不说了。
5.4 处理AABB
生成完一堆草后,要将每个草加到AABB里面,最后传给Instancing。

我假设每个草都是一个单位立方体的大小,所以是Vector3.one。如果草特别高,这里应该是需要修改的。
将每个草都塞进大的AABB中,将新的AABB传回给脚本的m_LocalBounds,给Instancing用。
Graphics.DrawMeshInstancedIndirect(blade, 0, m_Material, m_LocalBounds, m_argsBuffer);5.5 Surface Shader – 踩坑
这里有个小问题,由于当前Material是Surface Shader,Surface Shader的Vertex已经默认计算了AABB的center做了顶点偏移,所以之前传进去的世界坐标就不能直接用。还需要传AABB的center进去,减掉才行。好奇怪啊,不知道有没有什么优雅的方法。

5.6 简单的摄像机距离剔除+渐隐
目前在CPU将所有生成的草都传进了Compute Shader中,然后所有的草都会加进AppendBuffer中。也就是说没有任何剔除逻辑可言。

最简单的剔除方案就是根据摄像机与草地的距离做剔除。在Inspector面板开放一个数值表示剔除距离。计算摄像机与当前草实例的距离,如果大于设定的数值,则不添加到AppendBuffer中。

首先在 C# 中传入相机的世界坐标。下面是半伪代码:
// 获取摄像机
private Camera m_MainCamera;

m_MainCamera = Camera.main;

if (m_MainCamera != null)
    m_ComputeShader.SetVector(ID_camreaPos, m_MainCamera.transform.position);
CS中,计算草地和摄像机的距离:
float distanceFromCamera = distance(input.position, _CameraPositionWS);
距离函数代码如下:
float distanceFade = 1 - saturate((distanceFromCamera - _MinFadeDist) / (_MaxFadeDist - _MinFadeDist));如果数值小于0,就直接return。
// skip if out of fading range too
if (distanceFade < 0.001f)
{
    return;
}
在剔除与不剔除之间的部分,设置一下草的宽度+Fade值,达到渐隐的效果。
result.height = (bladeHeight + bladeHeightOffset * (xorshift128()*2-1)) * distanceFade;
result.width = (bladeWeight + bladeWeightOffset * (xorshift128()*2-1)) * distanceFade;
...
result.fade = xorshift128() * distanceFade;
下图为了方便演示,把两个都设置得比较小。

实际效果我觉得还是很不错的,十分流畅。如果不修改草的宽高,效果就会大打折扣。
当然了,也可以修改一下逻辑:不要完全剔除超过最大绘制范围的草,而是减少绘制的数量;或者是在过渡区的草选择性的绘制。
两种逻辑都可以,如果是我我会选择后者。
5.7 维护一组可视ID Buffer
所谓视锥体剔除,就是在CPU阶段,通过各种方法减少GPU多余的计算。
那怎么让Compute Shader知道哪些草需要渲染,哪些需要Cull呢?我的做法是维护一组ID List。长度是所有草的数量。如果当前草需要被剔除,否则就记录需要渲染的草的索引值。
List<uint> grassVisibleIDList = new List<uint>();

// buffer that contains the ids of all visible instances
private ComputeBuffer m_VisibleIDBuffer;

private const int VISIBLE_ID_STRIDE        =  1 * sizeof(uint);

m_VisibleIDBuffer = new ComputeBuffer(grassData.Count, VISIBLE_ID_STRIDE,
    ComputeBufferType.Structured); //uint only, per visible grass
m_ComputeShader.SetBuffer(m_ID_GrassKernel, "_VisibleIDBuffer", m_VisibleIDBuffer);

m_VisibleIDBuffer?.Release();
既然在传入Compute Shader之前,就已经有一部分草被剔除了,那么Dispatch的数量就不再是所有草的数量,而是当前List的数量。
// m_ComputeShader.Dispatch(m_ID_GrassKernel, m_DispatchSize, 1, 1);

m_DispatchSize = Mathf.CeilToInt(grassVisibleIDList.Count / threadGroupSize);
生成一个全部可视的ID序列。
void GrassFastList(int count)
{
    grassVisibleIDList = Enumerable.Range(0, count).ToArray().ToList();
}
并且每一帧都应用上传到GPU中。准备工作就完成了,接下来用Quad树操作这个数组。
5.8 四/八叉树存储草索引
可以考虑将一个AABB划分为多个子AABB,然后用四叉树存储管理。

目前,所有的草都在一个AABB里面。接下来构建一个八叉树,将这个AABB中的所有草都放进各个分支中。这样就很方便的在CPU前期做视锥体剔除。

怎么存呢?如果当前的草地垂直落差较小,那么用四叉树就足够了。那如果是开放世界,山脉高低起伏的,那就用八叉树。但是考虑到草是水平的密度比较高,我这里使用了一个四叉树+八叉树的结构。根据深度的奇偶来决定当前深度是分四个节点还是八个节点。如果不需要强烈的高度划分,就全用八叉树也行,我感觉效率可能会低一点点。这里直接一把平均分配,后期优化可以考虑根据变长动态变化的划分AABB方式。
if (depth % 2 == 0)
{
    ...
    m_children.Add(new CullingTreeNode(topLeftSingle, depth - 1));
    m_children.Add(new CullingTreeNode(bottomRightSingle, depth - 1));
    m_children.Add(new CullingTreeNode(topRightSingle, depth - 1));
    m_children.Add(new CullingTreeNode(bottomLeftSingle, depth - 1));
}
else
{
    ...
    m_children.Add(new CullingTreeNode(topLeft, depth - 1));
    m_children.Add(new CullingTreeNode(bottomRight, depth - 1));
    m_children.Add(new CullingTreeNode(topRight, depth - 1));
    m_children.Add(new CullingTreeNode(bottomLeft, depth - 1));

    m_children.Add(new CullingTreeNode(topLeft2, depth - 1));
    m_children.Add(new CullingTreeNode(bottomRight2, depth - 1));
    m_children.Add(new CullingTreeNode(topRight2, depth - 1));
    m_children.Add(new CullingTreeNode(bottomLeft2, depth - 1));
}
视锥体与AABB的检测用 GeometryUtility.TestPlanesAABB 就好了。
public void RetrieveLeaves(Plane[] frustum, List<Bounds> list, List<int> visibleIDList)
{
    if (GeometryUtility.TestPlanesAABB(frustum, m_bounds))
    {
        if (m_children.Count == 0)
        {
            if (grassIDHeld.Count > 0)
            {
                list.Add(m_bounds);
                visibleIDList.AddRange(grassIDHeld);
            }
        }
        else
        {
            foreach (CullingTreeNode child in m_children)
            {
                child.RetrieveLeaves(frustum, list, visibleIDList);
            }
        }
    }
}
这段代码是关键部分,传入:
- 摄像机视锥体的六个平面 Plane[]
- 存储所有在视锥体内节点的 Bounds 对象的列表
- 存储所有在视锥体内节点包含的草地索引的列表
调用这个四/八叉树的方法,就可以得到所有在视锥体内的包围盒列表、草地列表。
然后就可以将得到的所有草地索引做成一个Buffer传给Compute Shader。
m_VisibleIDBuffer.SetData(grassVisibleIDList);为了得到可视化的AABB,可以用 OnDrawGizmos() 方法。

将刚刚视锥体剔除得到的所有AABB传进这个函数。这样就可以直观看到AABB了。


还要将所有在视锥体内的写入可见草中。

5.9 草叶闪烁问题 – 踩坑
在这里我踩了一个小坑。当我完整了八叉树的编写,并且成功像上图一样划分出了诸多子AABB。但是当我移动摄像头的时候,草在疯狂闪烁。GIF视频啥的我有点懒不想弄,观察一下下面两张图,我只是稍微移动了一下视角,并且改变了当前Visibility List。草的位置就会大跳跃,连续地看就是草在闪烁。


我百思不得其解,Compute Shader的剔除也没问题。

Dispatch数量也是根据Visibility List的长度来运算的,因此计算着色器的线程肯定是开够的。

并且DrawMeshInstancedIndirect也没问题。

问题出在哪呢?
经过漫长的调试,我发现问题出在Compute Shader的Xorshift取随机数的过程。
在使用_VisibleIDBuffer之前,一个草对应一个线程ID,这是从草出生那一刻就已经决定的了。而现在加入了这一组索引,又不将传入随机值的ID改成 Visible ID ,就会出现随机数字非常离散的感觉。

也就是将之前的id全部都换成从_VisibleIDBuffer 取的索引值!

5.10 多物体交互
目前只有一个trampler传入。不传还会报错,不能忍。

关于交互的参数有三个:
- pos – Vector3
- trampleStrength – Float
- trampleRadius – Float
现在将trampleRadius塞进pos(Vector4)里面(塞另外一个也行,看需求),用SetVectorArray将位置数组传进去。这样每个交互对象都可以拥有一个专用的交互半径。肥肥的交互物体半径调大一些,瘦瘦的就小一些。也就是将下面这行去掉:
// SetGrassDataBase中,不需要每帧上传
// m_ComputeShader.SetFloat("trampleRadius", trampleRadius);
变成:
// SetGrassDataUpdate中,每帧都要上传
// 设置多交互物体
if (trampler.Length > 0)
{
    Vector4[] positions = new Vector4[trampler.Length];
    for (int i = 0; i < trampler.Length; i++)
    {
        positions[i] = new Vector4(trampler[i].transform.position.x, trampler[i].transform.position.y, trampler[i].transform.position.z,
            trampleRadius);
    }
    m_ComputeShader.SetVectorArray(ID_tramplePos, positions);
}
然后还得传一个交互物体的数量,让Compute Shader知道需要处理多少个交互物体。这个也是需要每一帧更新的。我习惯为每一帧都更新的物体存储一个ID索引,这样效率更高。
// 初始化中
ID_trampleLength = Shader.PropertyToID("_trampleLength");
// 每帧中
m_ComputeShader.SetFloat(ID_trampleLength, trampler.Length);
我再包装了一下:


对应代码再修改一下,就可以在面板上随便调整每个交互物体的半径了。如果要丰富这个调节功能,可以考虑单独传一个Buffer进去。

在Compute Shader中,并且多个旋转组合起来,还是比较简单的。
// Trampler
float4 qt = float4(0, 0, 0, 1); // 四元数里的1就是这样的,虚部都是0
for (int trampleIndex = 0; trampleIndex < trampleLength; trampleIndex++)
{
    float trampleRadius = tramplePos[trampleIndex].a;
    float3 relativePosition = input.position - tramplePos[trampleIndex].xyz;
    float dist = length(relativePosition);
    if (dist < trampleRadius) {
        // 使用次方增强近距离的效果
        float eff = pow((trampleRadius - dist) / trampleRadius, 2) * trampleStrength;
        float3 direction = normalize(relativePosition);
        float3 newTargetDirection = float3(direction.x * eff, 1, direction.z * eff);
        qt = quatMultiply(MapVector(float3(0, 1, 0), newTargetDirection), qt);
    }
}
5.11 Editor实时预览
当前传给Compute Shader的摄像机是主相机,也就是游戏窗口那个。现在想要在编辑(Scene窗口)暂时得到主摄像机的镜头,启动游戏之后复原。可以使用 Scene View GUI 绘制事件。
以下是改造我当前代码的例子:
#if UNITY_EDITOR
    SceneView view;

    void OnDestroy()
    {
        // When the window is destroyed, remove the delegate
        // so that it will no longer do any drawing.
        SceneView.duringSceneGui -= this.OnScene;
    }

    void OnScene(SceneView scene)
    {
        view = scene;
        if (!Application.isPlaying)
        {
            if (view.camera != null)
            {
                m_MainCamera = view.camera;
            }
        }
        else
        {
            m_MainCamera = Camera.main;
        }
    }
    private void OnValidate()
    {
        // Set up components
        if (!Application.isPlaying)
        {
            if (view != null)
            {
                m_MainCamera = view.camera;
            }
        }
        else
        {
            m_MainCamera = Camera.main;
        }
    }
#endif
在初始化着色器的时候,在开头订阅事件,然后判断当前是否为游戏状态,是才传递一个摄像机。如果是编辑模式,那m_MainCamera这一项还是NULL。
void InitShader()
{
#if UNITY_EDITOR
    SceneView.duringSceneGui += this.OnScene;
    if (!Application.isPlaying)
    {
        if (view != null && view.camera != null)
        {
            m_MainCamera = view.camera;
        }
    }
#endif
    if (Application.isPlaying)
    {
        m_MainCamera = Camera.main;
    }
    ...
在逐帧Update的函数中,如果检测到m_MainCamera是NULL,那么断定当前是编辑模式:
// 传入摄像机坐标
        if (m_MainCamera != null)
            m_ComputeShader.SetVector(ID_camreaPos, m_MainCamera.transform.position);
#if UNITY_EDITOR
        else if (view != null && view.camera != null)
        {
            m_ComputeShader.SetVector(ID_camreaPos, view.camera.transform.position);
        }

#endif
六、砍草

维护一组Cut Buffer
// added for cutting
private ComputeBuffer m_CutBuffer;
float[] cutIDs;
初始化Buffer
private const int CUT_ID_STRIDE            =  1 * sizeof(float);
// added for cutting
m_CutBuffer = new ComputeBuffer(grassData.Count, CUT_ID_STRIDE, ComputeBufferType.Structured);
// added for cutting
m_ComputeShader.SetBuffer(m_ID_GrassKernel, "_CutBuffer", m_CutBuffer);
m_CutBuffer.SetData(cutIDs);
别忘了在Disable的时候释放。
// added for cutting
m_CutBuffer?.Release();
定义一个方法,传入当前位置和半径,计算草的位置。将对应cutID设为-1。
// newly added for cutting
public void UpdateCutBuffer(Vector3 hitPoint, float radius)
{
    // can't cut grass if there is no grass in the scene
    if (grassData.Count > 0)
    {
        List<int> grasslist = new List<int>();
        // Get the list of IDS that are near the hitpoint within the radius
        cullingTree.ReturnLeafList(hitPoint, grasslist, radius);
        Vector3 brushPosition = this.transform.position;
        // Compute the squared radius to avoid square root calculations
        float squaredRadius = radius * radius;

        for (int i = 0; i < grasslist.Count; i++)
        {
            int currentIndex = grasslist[i];
            Vector3 grassPosition = grassData[currentIndex].position + brushPosition;

            // Calculate the squared distance
            float squaredDistance = (hitPoint - grassPosition).sqrMagnitude;

            // Check if the squared distance is within the squared radius
            // Check if there is grass to cut, or of the grass is uncut(-1)
            if (squaredDistance <= squaredRadius && (cutIDs[currentIndex] > hitPoint.y || cutIDs[currentIndex] == -1))
            {
                // store cutting point
                cutIDs[currentIndex] = hitPoint.y;
            }

        }
    }
    m_CutBuffer.SetData(cutIDs);
}
然后在需要砍草的对象身上绑一个脚本:
using System.Collections;
using System.Collections.Generic;
using UnityEngine;


public class Cutgrass : MonoBehaviour
{
    [SerializeField]
    GrassControl grassComputeScript;

    [SerializeField]
    float radius = 1f;

    public bool updateCuts;

    Vector3 cachedPos;
    // Start is called before the first frame update


    // Update is called once per frame
    void Update()
    {
        if (updateCuts && transform.position != cachedPos)
        {
            Debug.Log("Cutting");
            grassComputeScript.UpdateCutBuffer(transform.position, radius);
            cachedPos = transform.position;

        }
    }

    private void OnDrawGizmos()
    {
        Gizmos.color = new Color(1, 0, 0, 0.3f);
        Gizmos.DrawWireSphere(transform.position, radius);
    }
}
在Compute Shader中,直接修改草的高度。(非常直截了当。。。)想改啥效果就随意了。
StructuredBuffer<float> _CutBuffer;// added for cutting

    float cut = _CutBuffer[usableID];
    result.height = (bladeHeight + bladeHeightOffset * (xorshift128()*2-1)) * distanceFade;
    if(cut != -1){
        result.height *= 0.1f;
    }
完工!

References
- https://learn.microsoft.com/zh-cn/windows/uwp/graphics-concepts/geometry-shader-stage–gs-
- https://roystan.net/articles/grass-shader/
- https://danielilett.com/2021-08-24-tut5-17-stylised-grass/
- https://catlikecoding.com/unity/tutorials/basics/compute-shaders/
- 筆記-初探compute-shader
- https://www.patreon.com/posts/53587750
- https://www.youtube.com/watch?v=xKJHL8nQiuM
- https://www.patreon.com/posts/40090373
- https://www.patreon.com/posts/47447321
- https://www.patreon.com/posts/wip-patron-only-83683483
- https://www.youtube.com/watch?v=DeATXF4Szqo
- https://catlikecoding.com/unity/tutorials/basics/compute-shaders/
- https://docs.unity3d.com/Manual/class-ComputeShader.html
- https://docs.unity3d.com/ScriptReference/ComputeShader.html
- https://learn.microsoft.com/en-us/windows/win32/api/D3D11/nf-d3d11-id3d11devicecontext-dispatch
- https://zhuanlan.zhihu.com/p/102104374
- unity-compute-shader-基礎認識
- https://kylehalladay.com/blog/tutorial/2014/06/27/Compute-Shaders-Are-Nifty.html
- https://cuihongzhi1991.github.io/blog/2020/05/27/builtinttourp/
- https://jadkhoury.github.io/files/MasterThesisFinal.pdf
发表回复